Battery switch on travel trailer function is crucial for managing your RV’s power. Understanding how it works is key to preventing electrical problems and maximizing your battery life. This guide breaks down the different types of switches, their functionalities, troubleshooting tips, and safety precautions, ensuring you’re confident in handling your travel trailer’s electrical system.
We’ll cover everything from the basics of how a battery switch directs power between your house batteries and the vehicle’s charging system to more advanced topics like integrating solar panels and troubleshooting common issues. We’ll even walk you through safely upgrading or replacing your switch if needed. Get ready to become a travel trailer electrical expert!
Types of Battery Switches in Travel Trailers
Choosing the right battery switch for your travel trailer is crucial for managing your power sources efficiently and safely. Different switches offer varying levels of control and complexity, each with its own set of pros and cons. Understanding these differences will help you select the best option for your needs and budget.
Single Battery Switches
A single battery switch is the simplest type. It’s a basic on/off switch that controls the power flow from your trailer’s battery to the 12-volt system. This is suitable for trailers with only one battery. The advantage is its simplicity and low cost. However, it lacks the flexibility to manage multiple batteries or isolate them for maintenance or charging.
Dual Battery Switches
Dual battery switches are designed for trailers with two batteries – typically a house battery and a starting battery. These switches allow you to isolate each battery independently, select both batteries for combined power, or turn off both. This offers better control and allows for independent charging of each battery, preventing one from draining the other. The disadvantage is a slightly higher cost compared to a single switch.
Rotary Battery Switches
Rotary switches provide a more sophisticated level of control, often with multiple positions. A common configuration allows for selecting the house battery, the starting battery, both batteries, or completely disconnecting both. Some more advanced rotary switches may incorporate additional features like an auxiliary position for connecting a solar panel or generator. These switches are generally more durable and reliable than simpler on/off switches.
The downside is they can be slightly more complex to operate and potentially more expensive.
Comparison Table of Battery Switches
| Feature | Single Battery Switch | Dual Battery Switch | Rotary Battery Switch |
|---|---|---|---|
| Number of Batteries Controlled | One | Two | Two or more (depending on model) |
| Control Options | On/Off | On/Off for each battery, combined, off | Multiple positions (e.g., House, Start, Both, Off, Aux) |
| Cost | Low | Medium | Medium to High |
| Ease of Use | Very Easy | Easy | Moderate |
Function of the Battery Switch
The battery switch in your travel trailer is a crucial component that controls the flow of power between your trailer’s house batteries and the charging sources, primarily your tow vehicle’s alternator or a shore power connection. It acts as a central on/off switch and, depending on the type of switch, can offer more sophisticated control over your battery bank.
Proper use of the battery switch is essential for maintaining your batteries and preventing electrical issues.The battery switch manages the power flow to prevent unwanted battery drain when your travel trailer is not connected to a charging source. For instance, if you leave your trailer disconnected for an extended period, the switch allows you to isolate the house batteries, preventing them from slowly discharging due to parasitic loads like interior lights or a refrigerator’s control board.
Conversely, when connected to a charging source, the switch allows power to flow to recharge the batteries. This ensures that your batteries remain charged and ready for use whenever you need them. Some switches also allow you to connect and disconnect individual battery banks, providing even finer control over your power system.
So, you’re planning a trip? Awesome! Don’t forget travel insurance! Check out aon travel insurance for comprehensive coverage. They’ve got options to fit different budgets and travel styles. And if you need something a little more specialized, consider exploring aon travel insurance as well; they often have unique packages. Basically, comparing these two is a great first step to securing your peace of mind while you’re adventuring abroad.
Safe Operation of a Battery Switch
Before interacting with any electrical component in your travel trailer, always ensure the system is turned off. This includes turning off any appliances and breakers within the trailer. Next, locate your battery switch; it’s usually clearly labeled and accessible. The switch itself will have positions that control power flow. Common positions include “Off,” “Battery,” “Both,” and “Shore.” “Off” completely disconnects the batteries, preventing any discharge.
“Battery” connects only the house batteries, typically for use when not connected to shore power. “Both” connects both the house batteries and the charging source, enabling charging and use simultaneously. “Shore” connects only the shore power connection to the batteries and loads, typically found on more sophisticated switches.To turn on the battery switch, carefully move the switch lever to the desired position.
Always ensure the switch is firmly in place. To turn off the switch, simply move the lever to the “Off” position. Remember to always consult your travel trailer’s owner’s manual for specific instructions regarding your particular battery switch model and electrical system. If you are unsure about any aspect of operating the switch, it is best to consult a qualified RV technician.
Ignoring these safety precautions can lead to short circuits, damaged equipment, and even fire hazards.
Troubleshooting Common Battery Switch Issues
Your travel trailer’s battery switch is a crucial component, ensuring you can easily switch between your trailer’s battery and your vehicle’s charging system or shore power. When it malfunctions, it can leave you stranded without power. Understanding common problems and how to troubleshoot them is essential for a smooth camping experience. This section will guide you through identifying and resolving typical battery switch issues.
Battery switch problems often stem from simple issues that can be easily fixed. However, ignoring them can lead to more significant problems, like a dead battery or even damage to your electrical system. A methodical approach to troubleshooting is key to quickly restoring functionality.
Common Battery Switch Problems and Their Causes
Several issues can cause your battery switch to malfunction. Identifying the symptom will help pinpoint the problem.
- Symptom: No power to the trailer’s appliances even when the switch is on. Potential Causes: Corrosion on the switch terminals, loose connections at the switch or battery, a blown fuse in the switch’s circuit, or a faulty switch itself.
- Symptom: The battery switch feels loose or wobbly. Potential Causes: Loose mounting screws, damaged switch housing, or worn-out switch components.
- Symptom: The switch makes a clicking or buzzing sound when you try to turn it on. Potential Causes: A faulty switch mechanism, loose connections, or a short circuit within the switch.
- Symptom: The battery drains quickly even when the switch is off. Potential Causes: A faulty switch that doesn’t completely disconnect the battery, a parasitic drain from an appliance or accessory, or a problem with the battery itself.
- Symptom: The switch is difficult to operate, requiring excessive force. Potential Causes: Corrosion, debris, or damage to the switch mechanism. This can also be caused by improper installation.
Troubleshooting Flowchart
This flowchart provides a step-by-step guide to diagnosing your battery switch problems. Follow the steps sequentially, checking each point before moving on to the next.
Start: Is there power to the trailer’s appliances?
Yes: The battery switch is likely functioning correctly. Check for other potential power issues.
No: Proceed to the next step.
Step 1: Check the battery switch position. Is it turned to the correct position (ON or appropriate setting)?
Yes: Proceed to Step 2.
No: Turn the switch to the correct position. If this solves the issue, no further troubleshooting is needed. If not, proceed to Step 2.
Step 2: Visually inspect the battery switch and connections for corrosion, loose wires, or damage.
Corrosion or loose wires found: Clean the terminals and tighten the connections. Test the power again. If the issue persists, proceed to Step 3.
No corrosion or loose wires: Proceed to Step 3.
Step 3: Check the fuses in the battery switch circuit. Replace any blown fuses. Test the power again.
Issue resolved: The problem was a blown fuse.
Issue persists: Proceed to Step 4.
Step 4: If all previous steps fail, the battery switch itself may be faulty and require replacement. Consult a qualified technician or replace the switch with a new one of the same specifications.
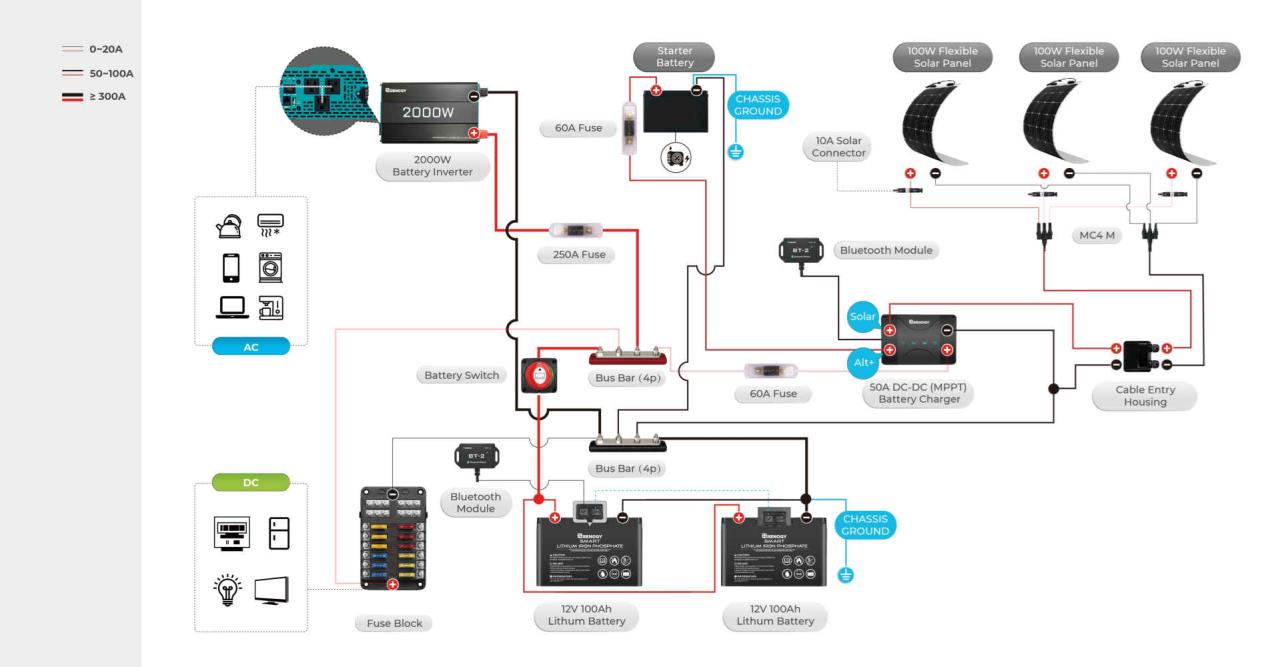
Battery Switch and Electrical System Integration: Battery Switch On Travel Trailer Function
Your travel trailer’s battery switch isn’t an isolated component; it’s a crucial junction in a complex electrical network. Understanding its interaction with other systems like solar panels, the converter, and the inverter is key to maintaining reliable power throughout your RV. A properly functioning battery switch ensures efficient power distribution and prevents potential damage to your electrical components.The battery switch acts as the central control point, directing power flow from your batteries to the various systems in your travel trailer.
It allows you to isolate different parts of the system for maintenance or to prevent battery drain. This control is essential for managing your power resources effectively and maximizing battery life.
Power Flow Diagram
Imagine a simple diagram showing the flow of power in a typical travel trailer electrical system.
                                     +-----------------+
                                     |  Solar Panels   |
                                     +--------+--------+
                                             |
                                             |
                                             V
                                     +--------+--------+
                                     |  Charge Controller|
                                     +--------+--------+
                                             |
                                             |
                                             V
                                     +--------+--------+
                                     |   Battery Bank   |
                                     +--------+--------+
                                             |
                                             |
                                             V
                                     +--------+--------+
                                     | Battery Switch  |------>  +--------+--------+
                                     +--------+--------+        |  Converter/Charger|
                                                              +--------+--------+
                                                                    |
                                                                    V
                                                            +--------+--------+
                                                            |      Inverter     |
                                                            +--------+--------+
                                                                    |
                                                                    V
                                                   +-----------------+
                                                   |   AC Outlets     |
                                                   +-----------------+
                                                                    |
                                                                    V
                                                   +-----------------+
                                                   |  DC Appliances   |
                                                   +-----------------+
The solar panels generate DC power, which is regulated by the charge controller before reaching the battery bank.
The battery bank stores the DC power generated by the solar panels and the converter/charger.
The battery switch controls the flow of power from the battery bank to the converter/charger and other DC appliances.
The converter/charger converts 12V DC power from the batteries to 120V AC power for household appliances.
The inverter converts 12V DC power from the batteries to 120V AC power for higher-power appliances.
Impact of a Malfunctioning Battery Switch
A malfunctioning battery switch can have significant consequences on your travel trailer’s electrical system. For example, a switch that’s stuck in the “off” position will prevent power from reaching your appliances, rendering them unusable. Conversely, a faulty switch that remains “on” could lead to a continuous drain on your batteries, potentially leaving you with a dead battery bank when you need it most.
In more serious cases, a short circuit within the switch itself could cause damage to other components in the system, leading to costly repairs. This could involve issues ranging from blown fuses to damage to your converter or inverter. In some instances, the short circuit could even pose a fire hazard.
Safety Precautions and Maintenance
Working with your travel trailer’s electrical system, including the battery switch, requires careful attention to safety. Improper handling can lead to serious injury or damage to your RV. Always prioritize safety and follow established procedures to ensure a smooth and problem-free experience.
Proper maintenance is crucial for the longevity and reliable operation of your battery switch. Regular cleaning and inspection can prevent costly repairs and ensure the safety of your electrical system. Neglecting maintenance can lead to corrosion, poor connections, and potential fire hazards.
Safety Guidelines for Working with Battery Switches
Before working on any electrical components in your travel trailer, including the battery switch, it’s vital to disconnect the negative (-) battery terminal. This prevents accidental shocks and short circuits. Always wear appropriate safety glasses to protect your eyes from sparks or flying debris. Use insulated tools to avoid accidental contact with live wires. If you’re unsure about any aspect of the process, consult a qualified RV technician.
Never work on electrical components in wet or damp conditions.
Cleaning and Maintaining Battery Switch Connections
Corrosion is a common enemy of battery connections. To prevent it, regularly inspect the terminals and switch contacts for signs of corrosion, such as white powdery buildup or green discoloration. Clean the terminals and connections using a wire brush and baking soda paste. Apply a corrosion inhibitor or dielectric grease to the cleaned surfaces to prevent future corrosion.
Tighten all connections securely, ensuring a good electrical contact. A visual inspection should be done at least every six months, more frequently if the RV is stored outdoors in humid or salty environments.
Regular Inspections and Preventative Maintenance
Regular inspections are essential for early detection of problems. Check the battery switch for any signs of damage, loose connections, or overheating. Listen for any unusual clicking or buzzing sounds during operation. Test the switch’s functionality regularly to ensure it’s switching power correctly between the batteries and the RV’s electrical system. A preventative maintenance schedule that includes cleaning and inspecting the battery switch at least twice a year, or more often in harsh environments, will extend the lifespan of the switch and help prevent costly repairs down the line.
Consider a professional inspection as part of your annual RV maintenance routine.
Upgrading or Replacing a Battery Switch
Upgrading or replacing your travel trailer’s battery switch can significantly improve your camping experience, offering better power management and potentially extending the life of your batteries. Whether you’re dealing with a faulty switch or simply want a more advanced system, understanding the process and options available is key. This section will guide you through upgrading to a more sophisticated system and replacing a malfunctioning switch.
Upgrading to a More Advanced Battery Switch System
Upgrading your battery switch often involves moving from a simple, single-pole switch to a more complex system, such as a multi-bank switch or a smart battery management system. A multi-bank switch allows for independent control of multiple battery banks, enabling you to isolate and charge different batteries separately. Smart battery management systems offer automatic charging, monitoring, and even remote control via an app, providing precise control over your power resources.
The upgrade process involves disconnecting your existing switch, carefully routing new wiring (if necessary), and installing the new switch according to its manufacturer’s instructions. Properly identifying the positive and negative terminals is crucial to avoid short circuits. You might need additional wiring, connectors, and potentially a larger fuse or circuit breaker depending on the amperage requirements of the new system.
Replacing a Faulty Battery Switch
Replacing a faulty battery switch is a straightforward process, but safety is paramount. Before starting, disconnect the negative terminal of your battery to prevent accidental short circuits. You will need basic tools like screwdrivers (Phillips and flathead), wire strippers/cutters, and possibly a multimeter to test continuity. The process typically involves removing the old switch from its mounting location, carefully noting the wire connections before disconnecting them.
So, you’re planning a trip? Awesome! Before you jet off, remember travel insurance is key. Check out Aon travel insurance for comprehensive coverage. They’ve got you covered for a ton of stuff, from lost luggage to medical emergencies. And if you want another option to compare, you might also want to look at Aon travel insurance – sometimes different plans offer better deals depending on your trip specifics.
Don’t leave home without it!
Once the old switch is removed, the new switch is installed in its place, ensuring all wires are correctly connected according to the wiring diagram. After installation, reconnect the negative battery terminal and test the switch’s functionality. A multimeter can be used to verify that power is flowing correctly to each circuit.
Cost and Benefits of Different Replacement Battery Switch Options
Choosing the right replacement battery switch depends on your budget and needs. Here’s a comparison of common options:
| Battery Switch Type | Cost (Approximate) | Benefits | Drawbacks |
|---|---|---|---|
| Simple Single-Pole Switch | $10 – $30 | Inexpensive, easy to install. | Limited functionality; only allows for on/off control of a single battery bank. |
| Multi-Bank Switch (2-3 banks) | $50 – $150 | Allows independent control of multiple battery banks; improves charging efficiency and battery lifespan. | More complex installation; requires more wiring. |
| Smart Battery Management System | $200 – $500+ | Provides advanced features like automatic charging, monitoring, and remote control; maximizes battery performance and lifespan. | High initial cost; requires more technical expertise for installation. |
Illustrative Example
Let’s examine a common battery switch setup in a travel trailer, focusing on the components, wiring, and power flow under various operating conditions. Understanding this setup is crucial for safe and efficient use of your trailer’s electrical system.
This example uses a typical two-battery setup with a battery combiner switch. One battery is dedicated to house functions (lights, appliances, etc.), while the other is reserved for starting the trailer’s engine. A shore power connection is also included.
Battery Switch Panel Description, Battery switch on travel trailer function
A typical battery switch panel might house a three-position switch (Off, Battery 1, Battery 2/Both), indicator lights showing the charge status of each battery (often LEDs), and potentially a fuse or circuit breaker for added protection. The panel itself is usually mounted in a readily accessible location, often near the batteries themselves for easy monitoring. The physical switch itself is usually robust, designed to handle the current draw from the batteries and capable of withstanding vibrations and environmental conditions common in travel trailers.
Wiring Diagram and Component Specifications
Imagine a simplified diagram. The positive (+) terminals of both batteries are connected to the battery combiner switch. The output of the combiner switch goes to the main power distribution panel. The negative (-) terminals of both batteries are connected directly to the chassis of the trailer (ground). The shore power connection also feeds into the main power distribution panel.
The main power distribution panel then distributes power to the various circuits in the trailer. Each battery might have a capacity of around 100 Amp-hours (Ah), and the wiring would be appropriately sized, likely using 8-gauge or larger wire for the main runs to handle the potential current draw. The fuses or circuit breakers within the distribution panel would be sized to protect the individual circuits.
Power Flow Under Different Conditions
- Charging with Shore Power: When shore power is connected, the converter/charger in the trailer will charge both batteries. The battery combiner switch would be set to “Both” allowing both batteries to receive the charge from the converter/charger. The indicator lights on the panel would illuminate to show the charging status of the batteries.
- Discharging with House Loads: When using the trailer’s appliances, the power flows from the selected battery (through the combiner switch) to the main power distribution panel, and then to the various appliances. If the switch is in the “Battery 1” position, only Battery 1 powers the house loads. If “Battery 2” is selected, only Battery 2 provides power. If “Both” is selected, both batteries supply power simultaneously.
- Starting the Engine: The starter battery (typically Battery 2) is used exclusively to start the trailer’s engine. The combiner switch should be set to “Off” or “Battery 1” to isolate the house battery and prevent excessive current drain during cranking.
- Charging while Driving: Many travel trailers have a charging system that charges the batteries while the vehicle is running. This system usually connects to the vehicle’s alternator, charging both batteries while driving. The battery combiner switch is typically set to “Both” for this.
Indicator Light Interpretation
The indicator lights on the battery switch panel usually provide a visual indication of the battery’s state of charge. A solid green light generally indicates a full charge, while a flashing green or amber light may show it’s charging. A red light might signal a low charge or a problem with the battery. Always refer to the specific instructions provided with your battery switch panel for the exact meaning of the indicator lights.
Mastering your travel trailer’s battery switch is all about understanding its function, maintaining it properly, and knowing how to troubleshoot problems. By following the safety guidelines and maintenance tips Artikeld here, you’ll ensure a reliable power supply for all your adventures. Remember, a well-maintained battery switch is your key to a smooth and enjoyable RV experience. Happy travels!
Common Queries
What happens if my battery switch is faulty?
A faulty switch can lead to power loss, inability to charge batteries, or even electrical hazards. Symptoms include dim lights, non-functioning appliances, and inability to start the vehicle.
How often should I inspect my battery switch?
Inspect your battery switch at least once a year, or more frequently if you notice any issues. Check for corrosion, loose connections, and proper operation.
Can I use a different type of battery switch than what came with my trailer?
Yes, but ensure the amperage rating is sufficient for your system’s needs and that the wiring is compatible. Consult an RV electrician if you’re unsure.
How do I clean corrosion from my battery switch?
Use a wire brush to clean the terminals, then apply a corrosion inhibitor. Disconnect the battery before cleaning.
